Posts Tagged '12c'


Service Bus 12c – Using XQuery map

In this post, you will learn to create and use XQuery maps in message flow using the same Service Bus project used in previous posts.

clip_image002[4]

And here we are creating XQuery map for Address transformation. The Source WSDL CustomerPS.wsdl and Target WSDL AddrValidationService.wsdl  are available here and here respectively. Make sure that you have these WSDLs copied in your project before proceeding with XQuery map creation.

Creating XQuery map:

Right click XQueries folder in XYZCustomer project and select New -> XQuery File ver1.0 to create new XQuery. Give both file and function name as AddrToAddrBSInput as shown below.

clip_image002

Click + icon to add Source parameter and give name as inputAddr.

clip_image004

Click pencil icon for Sequence Type to bring up Function Parameter Type window. Click browse icon and select Customer element in CustomerPS.wsdl as shown below. Here Customer element has address fields.

clip_image006

Click OK and retain default values for all the other properties in Function Parameter Type window as shown below.

clip_image008

Go back to Create XQuery Map window by clicking OK twice. Now click pencil icon for Target to bring up Function Result Type window. Click browse icon and select addrval_input element as shown below. Observe that the WSDL being used is AddrValidationService.wsdl.

clip_image010

Click OK thrice to bring up the Transformation editor and also do the initial mapping of attributes as shown below. You can map the fields by connecting Source and Target elements directly.

clip_image012

Drag concat function from Components -> XQuery Functions -> String Functions into Mappings swim lane. Connect Address2 and Address3 input elements to this function as shown below, as Target element expects concatenation of all address lines.

clip_image014

Address Validation service expects address lines with ‘,’ as delimiter, so go to XQuery Source tab and modify concat function as shown below.

clip_image016

Testing XQuery map:

It’s always advisable to test your XQuery to verify that mapping is working as expected. So right click XQuery file in XYZCustomer project and select Run XQuery.

clip_image017

clip_image019

Click List of variables button (highlighted above) to bring Edit Variable screen and select options as shown below.  This will generate the sample inputs automatically.

clip_image021

Click save icon and give file name as SampleCustomerInput.xml and click Add to Sequence.

clip_image023

Click OK and go back to Run XQuery screen. Give Target file name as AddrServiceInput by clicking Save icon.

clip_image025

Click Run and verify output of XQuery map to see mapping is working as you expected. You can observe that all address elements in Source concatenated and assigned to single element address_line in Target. You can also verify sample Source and Target files created in your XQueries folder.

clip_image027

Using XQuery map:

Drag Assign activity into Service Callout from Message Processing or place it at any other place in your Message Flow depending on where you want to use this transformation.

clip_image029

In Properties tab, select XQuery Resources for Value property.

clip_image031

In Expression Builder, click Browse icon and select the XQuery mapping.

clip_image033

Click OK. Use the following steps to set value for Binding property.

clip_image035

clip_image037

Click OK twice and set addrReqBody as the value for Variable property. This variable will contain the transformed value of address and can be used in your message flow later.

clip_image039

Service Bus 12c – Using Domain Value Maps (DVM)

In this post, you will learn to use Domain Value Maps (DVM) in message flow.

We consider the business requirement of performing Address Validation in message flow based on a configurable property and we use DVM to store this Configurable Property.

Creating Domain Value Map (DVM)

Create a new folder named DVM in XYZCustomer project. Right click DVM folder and select New -> Domain Value Map.

clip_image001 

Give Config as File Name and give DVM entries as shown below. The domain name PropertyName represents Configurable Properties and the domain PropertyValue represents configurable property values respectively.

Using this DVM, you can extend the same logic to any number of configurable properties in your Service Bus Application. For our requirement, give property name as ValidateAddress and set it’s initial value as Y.

clip_image003

Click OK to bring up DVM editor.

clip_image005

You can use JDeveloper to modify DVM or you can also modify it in sbconsole. Remember you need to create a session before modifying anything.

clip_image007

Using DVM in Message Flow

Drag Stage node into Stages placeholder of Request Pipeline and set name as AddrValidation in Properties tab.

clip_image009

Drag Assign activity into AddrValidation stage from Message Processing. Bring up expression builder for Value property and give expression as shown below. Alternatively you can select the function from Functions -> Custom XPath Functions -> Dvm functions. Make sure that you give complete qualified path of DVM containing Service Bus Project name too.

clip_image011

Set Variable property as ConfigVar. Now your Properties tab should look like below.

clip_image013

Address Validation business service should be invoked only when the value of this configuration property ‘Y’. So drag If Then activity into AddrValidation stage after Assign from Flow Control and set condition as $ConfigVar=’Y’.

clip_image015

Service Bus provides Service Callout, Routing and Publish activities to route incoming request to an appropriate business service. Routing and Service Callout are used for Synchronous where as Publish activity is used for one-way communication.

Routing node always depicts end of message flow so you can’t place any activities after Routing node. Hence use Service Callout for all intermediate service calls in pipeline. Drag Service Callout from Communication into If Then branch as shown below.

clip_image017

In Properties tab, browse and select AddrValidationServiceBS for Service property.

clip_image019

Service Bus 12c–Creating Proxy Service using Pipeline Template

In this post, you will learn to create Pipeline and expose it as Proxy Service using Pipeline Template created in previous post.

You need a WSDL to be used in Proxy Service and you can get the one used in this post from here. You can copy WSDL into any of your Service Bus project directory in file system directly. And click Refresh in Project Explorer so that these resources will be shown. We will use the following Projects.

clip_image002

Right click Pipelines folder and select New -> Pipeline.

clip_image004

Give name as CustomerPSPipeline and select the option From Template as shown below.

clip_image006

Click Search icon to bring up Resource Chooser and select Pipeline Template.

clip_image008

Click OK to go back to Create Pipeline Service window and click Next.

clip_image010

Click Browse WSDLs icon (highlighted above) and select CustomerPS.wsdl from XYZCustomer project as shown below and click OK.

clip_image012

Verify that WSDL and binding is selected. Click Search icon for Proxy Location and select ProxyServices folder as shown below.

clip_image014

Click Select and modify Proxy Name to CustomerPS. Now your Create Pipeline Service window should look like below.

clip_image016

Click Finish. Verify both Pipeline and Proxy Service are created in Pipelines and ProxyServices folders respectively as shown in Project Explorer.

clip_image018

Observe that new tab is opened showing CustomerPSPipeline had inherited all placeholders, names and properties from your Pipeline Template. You can modify/add activities in placeholders and the properties of inherited activities. Since a few of the properties to be specified mandatorily in concrete pipelines and are not mentioned in template, you will see red marks (see below) both in Project Explorer and editor.

clip_image020

Open CustomerPS and navigate to Transport configuration as shown below. Modify Endpoint URI as /entity/CustomerService. So your service consumers can access your proxy service using following URL:

http://<host>:<port>/entity/CustomerService

clip_image021

Go to Message Handling tab and select SOAPAction Header as Selection Algorithm. This would enable proxy service to determine operation at runtime based on SOAP Action sent in HTTP header. These changes should resolve errors in Proxy Service and you can observe that red marks are not seen now.

clip_image023

To resolve errors in Pipeline you should set the properties of Validate activity. In Properties tab of Validate activity, for Schema property click Search icon and select Customer element from proxy service WSDL as shown below. This would enable Service Bus validate input payload against the selected schema at runtime.

clip_image002[8]

For Location property, bring up expression editor by clicking iconclip_image003. Drag or shuttle Customer element into Expression field as shown below and click OK. Now you can observe that all red marks are gone for Pipeline as well.

clip_image005

Now your properties tab for Validate activity should look like below.

clip_image007

Now your Service Bus Overview Editor should look like below.

clip_image025

Service Bus 12c – Creating Pipeline Template

In this post, you will learn how to create Pipeline Templates in Service Bus 12c.

A Pipeline Template defines general shape or pattern of your message flow. We use Service Bus project XYZCustomer shown below for the demonstration purpose and we intended to create proxy service performing CRUD operations on objects like Customer.

clip_image002

Note: You can create new folders by navigating to File -> New -> From Gallery -> General -> Folder.

Right click Pipelines folder and select New -> Pipeline Template.

clip_image004

Give a meaningful name. Here we are using name CustomerPipelineTemplate.


clip_image006


Click Next. In this screen, you can choose service type depending on your requirement. Here we want to create WSDL based proxy service, so choose Service Type as WSDL SOAP as shown below.

clip_image008

Click Finish and verify that new Pipeline Template is created and opened in a separate tab as shown below.

clip_image010

Pipeline templates are the right candidates to keep common logic or enforce pattern of message flow to be followed across Proxy services. Typically, you may want to perform following common activities for different operations that your Proxy Service supports.

  • Validation of payload against schema
  • Routing to a business service (e.g: CustomerServiceBS)
  • Error Handling

Along with above functionality, your Pipeline Template needs to have nodes like Operational branch, Pipeline Pair, Stages etc…

When consumers call Proxy Service, it has to take different execution paths based on operation called. The Service Bus provides Operational Branch node serving this purpose. So drag Operational from Template Placeholders onto pipeline template where yellow circle is shown.


Note: All Nodes or activities used in message flow for Pipeline or Pipeline template are available in Components -> Message Flow under different sections. If you don’t see Components window, get it by selecting Window -> Components.

clip_image012

clip_image014

Click BranchNode1 and set name as CustomerOperation in Properties tab as shown below. As a best practice, always give meaningful labels for Nodes and other activities (wherever applicable).

clip_image016

Now drag Pipeline Pair from Nodes into Branch and give name as PipelinePair and rename Stage1 node in Request Pipeline to Validation in Properties tab.  Now your pipeline template should look like below.

clip_image018

Service Bus provides Validate activity to do payload validation against schema. So drag Validate activity into Validation stage from Message Processing.

clip_image020

In Properties tab, set Location property value as body and other properties as shown below. Here you will not select any schema or WSDL for validate activity as it’s just template and we will not have any payload available.

clip_image022

There may be additional validations to be performed while designing message flow in concrete Pipelines which requires a place holder. So drag Actions into Validation stage as shown below from Template Placeholders.

clip_image024

Delete Stage1 in Response Pipeline by selecting Delete option on right click. Also you may need to create several Stage nodes in your concrete Pipeline’s message flow. So create a place holder for the same in your template. Drag Stages into pipeline after Validation stage and in Response Pipeline from Template Placeholders. Now your pipeline pair node should look like below.

clip_image026

Routing node always depicts end of your message flow and you will not be able to place any other activities after this node. So drag and place Route after PipelinePair from Template Placeholders and set name as Route in Properties tab. Observe Actions placeholder which allows user to place any type of activity while designing message flow for your concrete pipelines.

clip_image028

Error handling is another aspect of message flow where you may want to follow similar approach for all Proxy Services. So drag Error Handler onto CustomerPipelineTemplate from Nodes. And in Properties tab, set name as ErrorHandler for Stage1 as shown below.

clip_image030

We will see Error Handling in detail in separate post. For the time being, you can drag Actions placeholder into ErrorHandler stage.

With this, you are done with Pipeline Template and can proceed with creation of Pipelines using this template.

Service Bus 12c – Deploying and Testing

During development, you may often deploy and test your Business and Proxy services to verify that you are able to send request and receive response as expected. And typically, if the service provider is external to your organization, you have to configure your business service to use HTTP proxy server.

Note: HTTP Proxy Server is a global resource to be created in Service Bus Application and can be attached to business service in Advanced Settings of Transport Details tab.

In Service Bus 12c, you can use either Integrated or Standalone WLS to test business/proxy services.

Integrated WLS:

Right click business/proxy service and select Run.

clip_image002

If Default Domain does not exist, JDeveloper will prompt for credentials to create Integrated WLS. Enter credentials click OK to start server.

clip_image004

Once the server starts, Test Console is opened as shown below. This Test Console shows all available operations (If it’s based on WSDL), Request Document section (to enter payload), Transport section (to enter transport headers) and Attachments section.

clip_image006

Click Execute and observe that you are able to send request and receive response as shown below. You can use Back to modify payload and repeat your test scenarios.

clip_image008

Standalone WLS:

You can also deploy your service bus project to standalone WLS from JDeveloper and test from sbconsole. Right click XYZCommon project and choose Deploy as shown below.

clip_image010

Finish deployment using steps shown below.

clip_image012

clip_image014

clip_image016

Once deployment is done, login to sbconsole using http://host:port/sbconsole. Clicking arrow icon (highlighted below) will bring up the same Test Console shown earlier.

clip_image018

Another option is exporting your projects as Configuration Jar and deploy to either Integrated or Standalone WLS. To do this, right click XYZCommon project and select Export as shown below.

clip_image019

Select Service Bus Resources option as shown below.

clip_image021

Select Configuration Jar as destination.

clip_image023

Click Next. Give Jar file name including file system path as shown below and click Finish.

clip_image025

Open sbconsle. Create new session by clicking Create to import configuration jar.

clip_image026

Click Import icon in Resources tab.

clip_image028

Select configuration jar using Choose File button as show below.

clip_image030

Click Next. Accept defaults and click Import.

clip_image032

Click Close on confirmation screen and verify new project is shown as below in Resources tab.

clip_image034

Click Activate and confirm the session so that your changes will be effective.

clip_image035

clip_image037

Similarly, you can export service bus project directly to server by choosing Server as shown below in Export Service Bus Resources window shown earlier.

clip_image039

Click Next and choose Destination Server as shown below.

clip_image041

Click Next. Accept defaults and click Finish. Once export is successful, you can launch sbconsole and test your business and proxy services as shown above.

clip_image043

Note: Developer can choose any of the above options for deploying and testing business/proxy services.

Service Bus 12c – Creating Business Services

In Service Bus, Business Services provide abstraction layer and take care of communication with Service Providers. In this post, you will see different ways of creating Business Service in Service Bus project using JDeveloper based on a WSDL. And for the demonstration purpose, we will consider the Service Bus project and WSDLs shown below.

biz1

Method 1:

Right click Service Bus project and select New -> Business Service.

clip_image002

Give a meaningful name for Business Service as shown below.

clip_image004

Click Browse WSDLs icon (shown above) and choose CustomerService WSDL as shown below.

clip_image006

Click OK to go back to Create Business Service wizard.

biz5

Method 2:

Open the Service Bus overview file (file with same name as your project) and drag HTTP adapter into from Components –> Service Bus –> Technology –> HTTP into External Services swim lane to bring up Create Business Service wizard as shown below.

adapter1

overview1

biz2

Give meaningful name for Business Service and click Next. Select the option WSDL and choose WSDL as shown in previous method by clicking Browse WSDLs icon.

biz3

biz4

Method 3:

Right click WSDL in Service Bus project and select Service Bus –> Generate Business Service as shown below.

wsdlbiz

Verify that Create Business Service wizard has come up showing WSDL and binding selected.

wsdlbiz1 

And the following steps are common irrespective of the above methods you choose to create Business Service.

Click Next and enter Endpoint URI of the service.

clip_image008

Click Finish to bring up a new tab showing CustomerServiceBS.bix.

clip_image010

Service Bus 12c – Creating Service Bus Application and Project

In Service Bus development, you make use of different resources like Proxy Service, Business Service, WSDL, XSD, XQuery, XSLT etc. Also there are other resources like SMTP Server, JNDI Provider called Global resources. Service Bus Project acts as a container for different resources and Service Bus Application is a high-level container for all these Service Bus projects and Global resources.

You usually start development activity with creation of new Service Bus Application. Create one by navigating to File -> New -> From Gallery -> Service Bus Tier. Select Service Bus Application and give meaningful name and click Finish. Here we are using ServiceBusAppl as Application Name.


Creating Service Bus Projects

Now you can proceed with the creation of Service Bus Projects considering reusability and modularity. Create new Service Bus Project by navigating to File -> New -> From Gallery -> Service Bus Tier. Select Service Bus Project and give meaningful name and click Finish. Here we are using XYZCommon as Project Name.


Now your Project Explorer should look like below showing Service Bus Application and Service Bus Project containing 2 files (pom.xml and XYZCommon). You will see a file with same name as your project called project overview file which opens up Service Bus Overview editor when opened.


 Now your Service Bus Overview Editor should look like below. Left swim lane is for services providing an entry point to application so limited to Proxy Services. Middle swim lane is for components providing routing and transformation so limited to Pipelines and Split-joins. Right swim lane is for references providing communication with actual service providers so limited to Business Services or Proxy Services. For more information refer to this link.


Service Bus 12c – A Hands-on Tutorial

I published a Service Bus 12c Tutorial considering the use case described in my previous blogs. The Tutorial is available for download here and would like to know your valuable comments. The WSDLs and other material used in this tutorial can be downloaded from here.

By the time you finish this tutorial, you will learn:

  • Creating Service Bus Application, Project, Proxy and Business services.
  • Working with resources like WSDL, XSD, XSLT, XQuery etc.
  • Sharing Service Bus resources across Service Bus projects to enable reuse and modularity.
  • Creating Pipeline Templates, Pipelines and using nodes like Pipeline Pair, Stage, Routing and Operational Branches.
  • Using Domain Value Maps (DVM) for storing configuring properties and using them in message flow.
  • Creating Service Accounts and using them in message flow at Runtime.
  • Enriching the messages using intermediate Service callouts in Pipelines.
  • Routing messages to business services using Service Callout, Routing and Routing Table.
  • Working with Split-Joins.
  • Using Service error handlers in Pipelines.
  • Securing Proxy service using OWSM.
  • Deploying and Testing Proxy and Business services.

SOA 12c – Durable Subscribers with Weblogic JMS

Business Events are used to notify the interested parties (subscribers) about an occurrence of activity which is of important to them. On raising the business events, the subscribers would consume them and process it based on their business flows. All these things would happen in a highly loose coupled manner and business events producers may not be aware of the subscribers. So when designing an application based on business events one of the aspects requires attention is, Will there be any loss of event? This is very important as subscribers are not in a position to request providers to raise event again, even if they do its going to be a duplicate event (occurrence) for other subscribers. Technically speaking, the loss of event can be translated into any of these following scenarios:

  • Subscriber received the business event but faulted during processing.
  • Subscriber is unavailable when the business event is published.
  • The hosted server itself is down when the business event is published.

Scenario 1: For this scenario, EDN provides different Consistency levels and Auto Retry feature which you can use. The post discusses this behavior and also highlights major differences between 11g and 12c SOA Suite releases. In other cases where this feature can’t be leveraged, developer had to take care of manually storing event information and retrieving later on processing failure.

Scenario 2: Typically this scenario may not arise in production environments but there is a possibility when event producer and subscribers are deployed on different managed servers and maintenance cycles for both are different. EDN 11g does not support for this case and it mandates Subscribers to be available when event is published. But in 12c, this scenario is handled using Durable Subscribers which we see shortly.

Scenario 3: This scenario also automatically handled by EDN as it queues the events. And once the server is up, the events in queue will get delivered to their respective subscribers.

In this post, we will see how Durable property works for Business Events. We will use the same 3 composites used in previous post, where we have 3 subscribers for CreateOrder and 1 subscriber for UpdateOrder business events respectively. From here onwards, we will use subscribers or composites terminology interchangeably.

  • Deployment of composites with Durable property to Yes.
  • Any of the Composites subscribed to business events are shutdown.
  • Redeployment of composites with same revision.
  • Redeployment of composites with different default revision.
  • Server shutdown and restart when a few business events are pending to be delivered.
  • Un-deployment of the composites.
  • Redeployment of composites after modifying Durable property to No.

So let’s us get started!!!

To start with let’s have a quick look at Events and Subscriptions used for demonstration. To view these navigate to soa-infra->Business Events.


Durable property to Yes:

Set Durable property to Yes for all subscribers and do deploy.

When Durable property is set to Yes, EDN leverages Weblogic JMS durable subscriptions and creates Durable subscribers for each such subscription. Durable subscriptions mean that Weblogic server will store the messages in persistent store until it gets delivered to subscriber. This can be observed in Weblogic Admin Console by navigating to Services->Messaging->JMS Modules->SOAJMSModule->EDNTopic->Monitoring->Durable Subscribers.

You can observe 4 Durable subscribers in the above screen where 3 of them for CreateOrder and 1 for UpdateOrder business events respectively. You can find out JNDI of JMS Topic used for an event in default JMS Mapping by navigating to Business Events screen from soa-infra and you can also modify this default JMS Mapping for business events.

Subscribers Down:

Shutdown EDNSubscribeSync composite and observe durable subscribers.

In above screenshot, you can observe that corresponding durable subscriber is inactive (observe value for Active column).

Now raise CreateOrder business event. Go to flow trace and observe that event is not delivered to this composite.

Also, since it’s a durable subscriber we would ideally expect this message to be stored by Weblogic server. Now go to Durable Subscribers and you can observe a pending message to be delivered.

Click Show Messages to see all pending messages.


Click on message to see details as shown below.


Now shutdown EDNSubscribeAsync composite and observe corresponding durable subscribers.

Raise another CreateOrder business event and observe pending messages.


Bring up EDNSubscribeAsync composite and you will see a new composite instance gets generated as the pending event is delivered by EDN.


Also observe that corresponding Durable Subscribers are active.

Now bring up EDNSubscribe composite and observe 2 new composite instances are generated for both of the pending messages.

Also observe that all Durable Subscribers are up.

Redeployment of Composites:

There will be no change in Durable subscribers, when composites are redeployed with the same revision or different revision as the default.

Server shutdown:

Shutdown EDNSubscribeSync and EDNSubscribeASync composites and raise 2 CreateOrder and 1 UpdateOrder business events. As shown below, these will be shown as pending for corresponding Durable Subscribers.


Now Shutdown SOA server and restart it. Navigate to EDNTopic and observe that messages are not lost and survived the server shutdown as expected. Bring up the composites and you would observe new instances get created as shown below.


In the above screenshot, the first 2 instances are created for CreateOrder and 3rd instance is created for UpdateOrder business events respectively.

Un-deployment of Composites:

Now Un-deploy EDNSubscribeSync composite. Navigate to Durable Subscribers and observe that only 3 subscribers exist.

Un-deploy EDNSubscribeASync composite too and observe that Durable Subscribers is reduced to 1 as shown below.

Now un-deploy all the composites and observe that all Durable Subscribers are deleted automatically.

Durable property to No

When you set Durable property to No and deploy the composites, you will not see any of the Durable Subscribers for EDNTopic as shown below.


Other Observations:

  • Durable subscribers are taking a little time to become active when server is restarted and shutdown composites are started up (scenario described above in Server shutdown section).
  • Client IDs for Durable subscribers are getting created differently based on event subscription consistency level. Observed that Client ID is set as edn_wljms_xa_client for OneandOnlyOne consistency level. For Guaranteed consistency level, it’s edn_wljms_localtxn_client. This denotes Global Transaction used for OneandOnlyOne and Local Transaction used for Guaranteed consistency levels respectively.

  • 12c documentation for EDN mentions, The EDN does not support durable subscriptions (whether they are backed by native AQ or Oracle WebLogic Server JMS). The subscribing service component must be running to receive events, though we are able to achieve this using Durable Subscribers. We see the same mention in 11g documentation too.

All of the above observations are nicely summarized over here, see table 33-2.

SOA 12c – Business Events and Consistency Levels

I have chosen Business Events as first feature to explore in recent release of SOA Suite12c. Also, I want to cross verify my earlier observations in 11g.

The initial observation is, now the new SOA project will have the folders for different artifacts and the folder Events is for edl files.

soaproj

Secondly, 12c   supports One and Only one and  Guaranteed consistency only and no longer supports immediate. Also new property Durable is added to event subscriptions.

edn1

Even migration of 11g composites to 12c is resulting into error, if composite uses immediate consistency level. We have to manually make this change by choosing either of the 2 supported consistency levels.

edn2

But in EM Console, we are still able to see immediate consistency level in the search region. You can navigate to this UI by selecting soa-infra –> Business Events.

edn3

Thirdly, in 11g  EDN uses DB AQ 11g by default for publish and subscribe model of business events. This can be confirmed by verifying value of MBean property EdnJmsMode.  False value denotes EDN using DB and True value denotes EDN using Weblogic JMS. You can verify by navigating to oracle.as.soainfra. config –> SoaInfraConfig –> soa-infra in Application Defined MBeans.

edn5

But in 12c, EDN uses Weblogic JMS by default.  This can be confirmed by verifying value of MBean property JmsType .  WLJMS value denotes EDN  using Weblogic JMS and  AQJMS value denotes EDN using AQ DB . You can verify by navigating to oracle.as.soainfra.config –> EDNConfig –> edn in Application Defined MBeans.

edn4

Another quick observation is, in 12c there is no Faults tab shown in Business Events page. You can select soa-infra –> Business Events to bring up this page. In 12c, we can do manual Retry and Abort of Business Events in Flow Instances screen itself which we will observe later in this post.

soainfra

Now let us start exploring functionality of Business Events from perspective of consistency levels like we did it earlier. As per 12c documentation, one of the major differences is auto retry is supported by Guaranteed consistency level too.

Use case:

We use mediator to raise  2 business events CreateOrder and UpdateOrder. We have following subscribers for CreateOrder event:

  • Mediator routing request to Async BPEL (EDNSubscribeToBPEL process in composite EDNSubscribe).
  • Mediator routing request to Sync BPEL (EDN2BPEL process in composite EDNSubscribe2 ).
  • Asynchronous BPEL process (SubscribeToEventBPELProcess  process in composite EDNConsistencyCheck).

And we have following subscribers for UpdateOrder event:

  • A mediator routing the request to ASync BPEL (in different composite)

Test EDNConsistencyCheck from EM console to raise these business events. The sample composites are available here.

Earlier to simulate Fault condition, we used <onReply/> tag  in mediator while routing to Asynchronous BPEL as shown below.

<switch>

<case executionType=”direct”

name=”Order2BPELProcess1.order2bpelprocess1_client.process”>

<action>

<transform>

<part name=”$out.payload”

function=”xslt(xsl/CreateOrder_To_process.xsl, $in.payload)”/>

</transform>

<invoke reference=”Order2BPELProcess1.order2bpelprocess1_client”

operation=”process”>

<onReply/>

</invoke>

</action>

</case>

</switch>

The behavior is quite different in 12c when same approach has been used to simulate Fault condition. This is resulting into non-recoverable fault in all the times. Though the same behavior is expected in 11g, in actual this fault was considered as recoverable and also auto-retry is made. So here we will simulate Fault condition by throwing Remote Fault manually.

edn6

Configuration:

Navigate to soa-infra-> Administration –> System MBean Browser -> Application Defined MBeans -> oracle.as.soainfra.config -> EDN Config –> edn in EM Console. Here, we can set EDN configuration including properties NumberOfRetrys and QueueWaitTime.

Though 11g has QueueWaitTime property, it was not considered as the retry interval. But in 12c, this property is being honored and we will observe the same later in this post.

edn4

Demonstration:


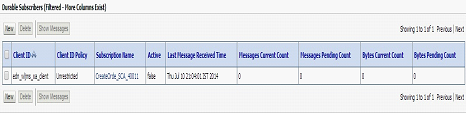
Verify Events and Subscriptions in Business Events. You can observe that there are 2 business events and 4 subscriptions The subscriptions page also shows you consistency level for each subscription.

events

subscr

Consistency Level – Guaranteed:

Make sure that all event subscriptions consistency level is set to Guaranteed and raise CreateOrder business event.

We can observe a lot of visual improvements in this Flow Trace screen. The composite instances are clearly marked as ‘Recovery Required’ and ‘Auto-retrying’ as applicable. As expected, the Asynchronous BPELs went into Auto Recovery and   Event auto retry is happening for Synchronous BPEL process. Also note that all  subscribers have received the business event raised though some faulted subscribers exist.

edn9

By clicking on the ‘Recovery Required’ link in Faults tab, we can observe that BPEL fault is pending for Invoke message recovery as shown below.

bpel recovery

You can also observe that Synchronous BPEL is marked as Recovery Required after retry is done for configurable number of times. Also the property value of QueueWaitTime is honored as the event Retry Interval.

eventrecovery

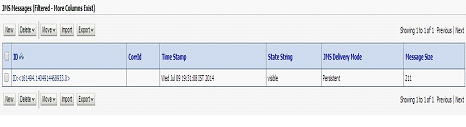
The Faults tab is shown as below along with number of retry attempts.

attempt

By clicking on the ‘Recovery Required’ link in Faults tab for this flow instance, we can observe that fault is pending for EDN recovery as shown below. From this popup, we can again do Retry manually or abort the flow using Retry and Abort buttons respectively.

ednrecover

Selecting a fault from Faults tab will highlight the corresponding flow instances along with retry attempts (if any).

edn11

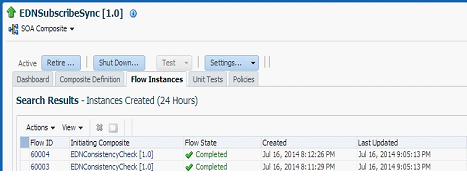
We can also do manual Retry or Abort from Flow Instances page. Selecting a Flow ID row will enable Abort Selected icon as shown below (if applicable).

abort

And same Faults tab shown earlier is also available in Flow Instances page as shown below.

fault2

Now set bpel.config.oneWayDeliveryPolicy to sync for all the Asynchronous BPELs. Raise CreateOrder event and observe that all the instances are auto-retrying as the BPELs would be invoked in Synchronous manner.

asyncassync

Now set bpel.config.oneWayDeliveryPolicy to async.cache for all the Asynchronous BPELs. Raise CreateOrder event and observe that auto-retrying is only happening for Synchronous BPEL.

asynccache

Now reset bpel.config.oneWayDeliveryPolicy to async.persist and bpel. config.transaction to requiresNew for Asynchronous and Synchronous BPEL respectively. Raise CreateOrder event and observe auto-retry is happening for Synchronous BPEL only.

Now set bpel.config.transaction  to notSupported for the Synchronous BPEL.  Raise CreateOrder event and again observe auto-retry is happening only for Synchronous BPEL.

Consistency Level – One and Only One:

When  above scenarios are tried using One and Only One consistency level, I observed the same behavior as Guaranteed. As per 12c documentation, the difference lies in type of transaction used (Local vs Global). Guaranteed uses Local where as One and Only one uses Global Transaction for De-queue and Delivery of Business Events.

Summary:

  • When Mediator routes request to Sync BPEL that throws fault and not caught, then event auto retry is happening irrespective of consistency level and value of bpel.config.transaction.
  • When Mediator routes request to ASync BPEL that throws fault and not caught, then event auto retry is not happening irrespective of consistency level with async.persist as value for bpel.config. oneWayDeliveryPolicy.  This makes sense as the transaction can’t be  propagated and value of bpel.config.transaction is irrelevant.
  • When Mediator routes request to ASync BPEL that throws fault and not caught, then event auto retry is happening irrespective of consistency level with sync as value for bpel.config.oneWayDeliveryPolicy. This makes sense as BPEL is invoked in Synchronous manner. Also the same behavior is observed, when an Async BPEL is directly subscribed to business event.
  • When Mediator routes request to ASync BPEL that throws fault and not caught, then event auto retry is not happening irrespective of consistency level with async.cache as value for bpel.config. oneWayDeliveryPolicy.

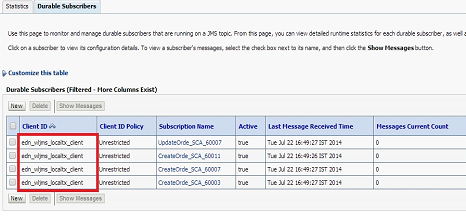
We will explore the Durable property of Event Subscriptions in next blog.


Pages

Enter your email address to subscribe to this blog and receive notifications of new posts by email.

Join 196 other subscribers

Enter your email address to follow this blog and receive notifications of new posts by email.