Posts Tagged 'Docker'

Introduction to Docker

It has been 5 years since docker brought containers into the mainstream production environments that changed the way of application development and deployment. This link gives a quick overview on why companies are considering container technologies.  I can say that i lagged behind in exploring docker so i tried some hands-on with docker recently so i wanted to post a few articles on the things i tried. Docker has great documentation so i will try to keep my posts simple and concise and give those documentation links wherever applicable.

In this post, we will look at docker installation and ways to create docker images and containers. I used Ubuntu 17.10 (artful) VM with docker version 17.12.1-ce in Windows 10 based laptop.

Installation:

Docker is available in 2 editions Docker Community Edition (CE) and Docker Enterprise Edition (EE). Docker CE is for developers to explore containers and Docker EE is for enterprise development. Docker CE updates are available via two channels:

  • Stable, gives reliable updates every quarter
  • Edge, gives new features every month

To install Docker CE, do:

Old versions can be uninstalled using sudo apt-get remove docker docker-engine docker.io. Refer to documentation for more information on installation.

To verify docker installation, sudo docker -v.

Post Installation:

To avoid using sudo for running docker commands do following. Refer to this link for more information.

sudo usermod -aG docker svgonugu

HTTP Proxy:

Things are not same when you are behind proxy and can face a few issues while connecting to internet. To add proxy settings in Ubuntu, do

  • Go to Show Applications -> Network -> Network Proxy to update system wide proxy settings.

  • If still facing issue from command line, edit /etc/bash.bashrc to add following lines and reopen terminal. If it’s required for the current session, just issue the same commands at command prompt.

                   export http_proxy=http://hostname:port

                   export https_proxy=http://hostname:port

  • To make apt-get working, create a file named apt.conf in /etc/apt directory with following lines as root user (sudo su).

             Acquire::http::proxy “http://user:password@host:port/”;

             Acquire::https::proxy “http://user:password@host:port/”;

  • Docker daemon also needs to connect to internet to pull and push images. Do following to let docker to use your proxy. Create http-proxy.conf with following contents as root user(sudo su) and copy to directory /etc/systemd/system/docker.service.d. Refer to this link for more information.

                    [Service]
                    Environment=”HTTP_PROXY=http://host:port”
                    Environment=”HTTPS_PROXY=http://host:port”

  • Restart the docker daemon so that proxy settings will be effective.

                    systemctl daemon-reload
                    systemctl restart docker

Images and Containers:

Image is like an installation including everything like code, configuration, runtime etc and container is running instance of an image.

Use docker run to create a container from an image. For example, issue docker run hello-world  as shown below. Docker first checks for local availability of image and downloads from docker registry if the same is not found.

Do docker ps -a to see all containers and use docker ps to see only running containers. In above example, the container is created from hello-world image, prints the message and exits the container. Since this image is not available in local it gets downloaded as shown above.

Do docker images to see all local images.

Now let us start an interactive ubuntu container using docker run -ti ubuntu /bin/bash. This starts an interactive container and also downloads an ubuntu image if not present in local. The -i option makes container interactive and the -t option attaches it to terminal.

Observe hostname is nothing but the container id using docker ps.

To stop container, do docker stop <<containerid>>

To restart container, do docker start <<containerid>>

To attach the started container to terminal, do docker attach <<containerid>>

Creating an Image:

Each docker image will have a base image and can be built manually or using a file called Dockerfile. We will see both of these approaches using a sample nodejs application. Note that its always recommended to use official image provided by nodejs.

Manual Creation:

Do following to spin up a new container based on ubuntu image and install nodejs v8. -p option is used for port forwarding i.e. connecting to 8888 port (first argument in command) on docker host will forward the request to port 8888 in docker container. -v option mounts the file system so that container can access it. in my case, i have sample nodejs module in directory /home/siva/mywork (first argument in command) so i mounted this directory to access it in the container using same path.

docker run -ti -p 8888:8888 -v /home/siva/mywork:/home/siva/mywork ubuntu /bin/bash 

apt-get update    (update the index)

apt-get install -y curl  (install package related to curl)

curl -sL https://deb.nodesource.com/setup_8.x | bash –

apt-get install -y nodejs  (install nodejs)

To verify nodejs installation, do node -v

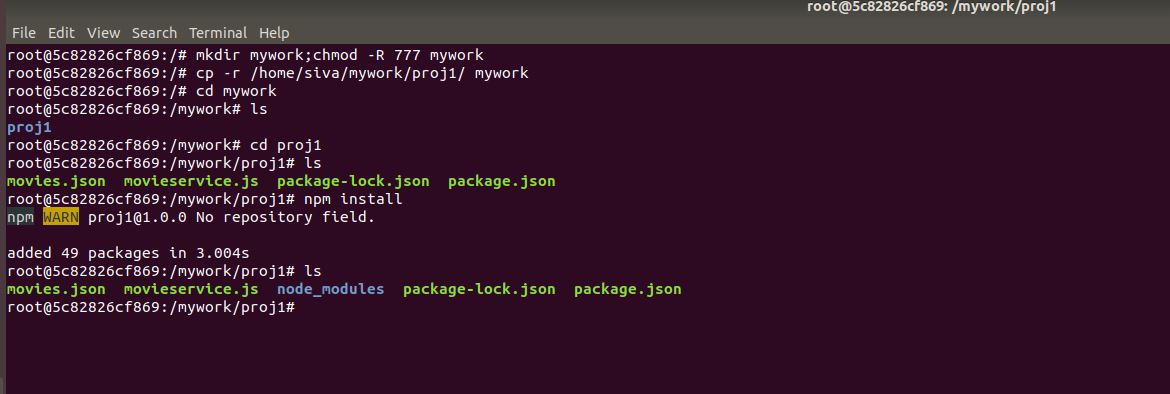
Now copy nodejs module from docker host to container as below.

mkdir mywork;chmod -R 777 mywork

cp -r /home/siva/mywork/proj1 mywork

cd mywork/proj1

npm install (install all nodejs module dependencies)

Run node movieservice.js and access service using browser url http://localhost:8888/movies.

Now our nodejs application container is up and running. To create a docker image from this container, do

exit the container and find container id using docker ps -a.

docker commit <<containerid>>

docker images (find the newly created image id)

docker tag <> mynodejs (tag the image to meaningful name)

docker images

Using Docker file:

Creating docker images manually may not be possible always and also collaboration can become difficult with the above approach. So docker provides another way of building an image from file called Dockerfile that can have a set of instructions. All manual steps we did earlier can be incorporated in Dockerfile and build image from it.

The mynodejs image created above, does not start node server as soon as container starts. Observe that we started the node server manually by issuing node movieservice.js command. We will make it happen using a Dockerfile and build a new image from it. So create a file named Dockerfile with following instructions. I have taken this example to make a point that even images created by us can be a base image. Note that Dockerfile should always start with FROM instruction specifying base image. CMD instruction is used to specify command to be executed when new container is started..

#from the base image
FROM mynodejs
CMD exec node mywork/proj1/movieservice.js

To build image from this Dockerfile, Do:

docker build -t samplenodeappl .

Note that above command is to be executed after navigating to directory having Dockerfile.

nodeappl

Now instantiate new container using docker run -ti -p 8888:8888 samplenodeappl. Verify that node application is up and running using url http://localhost:8888/movies.

nodeport

We can publish this image to a public repository or can setup a private repository to share. To push the image to docker hub (public repository), do

Create an user at hub.docker.com.

docker login

docker tag <<imageid>> svgonugu/samplenodeappl

docker push svgonugu/samplenodeappl

Observe that image name should be tagged something like svgonugu/samplenodeappl containing your repository name.

push

Login to docker hub to find this newly uploaded image.

hub

Images can be downloaded using pull command as highlighted above. Just to verify, we can delete the local image and pull it from repository.

Docker CLI Reference: https://docs.docker.com/edge/engine/reference/run/

Dockerfile  Reference: https://docs.docker.com/engine/reference/builder/#usage

NodeJS Installation: https://nodejs.org/en/download/package-manager/#debian-and-ubuntu-based-linux-distributions

VM Installation: https://wp.me/pEWnt-KN


Advertisement

Docker Containers for Oracle SOA Suite

In previous blog, we started with brief introduction of docker platform and also saw how to build images and run containers. In this blog, we will see how to setup an Oracle SOA Suite 12.2.1.3 environment with docker containers using Oracle official docker images. The README files available with official images have lot of information and one could easily create the docker images. So i just want to collate all this information here for quick reference.

I used Ubuntu 17.10 (artful) VM with docker version 17.12.1-ce in Windows 10 based laptop.

Installation:

Typical steps to be followed to install Oracle SOA Suite 12.2.1.3 in laptop:

  • Install JRE 8/JDK 8
  • Install the certified database.
  • Install Oracle SOA Suite/BPM Suite/OSB as per requirements.
  • Run RCU to create the required schemas
  • Configure the domain

In the world of docker the above steps translate to the following steps.

  • Build JRE 8 docker image
  • Build Oracle DB docker image
  • Build FMW infrastructure docker image
  • Build SOA Suite docker image
  • Start DB container
  • Start Admin Server container
  • Start Managed Server container

To start with, download official dockerfiles from https://github.com/oracle/docker-images and we use docker images related to OracleJava, OracleDatabase, OracleFMWInfrastructure and OracleSOASuite. Each of these folders have necessary scripts for installation but does not contain executables. Have all these folders copied into docker-images directory.

Build JRE 8 docker image:

  • Download server-jre-8u161-linux-x64.tar.gz  from link and copy into directory OracleJava/java-8.
  • Navigate to the above directory and run sh build.sh. We will observe the docker image oraclelinux:7-slim getting pulled from docker hub as the docker file contains instruction FROM oraclelinux:7-slim.
  • Once the build is complete we can see a new image available with tag oracle/serverjre:8.

  • Note that OracleJava folder also have docker files required to build JRE 9.

Build Oracle DB docker image:

  • Download files linuxamd64_12102_database_1of2.zip and linuxamd64_12102_database_2of2.zip from link and copy into directory OracleDatabase/dockerfiles/12.1.0.2. I had used 12.1.0.2 version though the latest is 12.2.0.1 because of smaller size.
  • Navigate to the directory OracleDatabase/dockerfiles and issue the following command. Option -v indicates the db version and the option -e represents Enterprise Edition.

                              sh buildDockerImage.sh -v 12.1.0.2 -e

  • Open OracleDatabase/dockerfiles/12.1.0.2/Dockerfile.ee to check the instructions that get executed during the image build. Observe oraclelinux:7-slim as the base image in this docker file.
  • Once the build is complete we can see a new image available with tag oracle/database:12.1.0.2-ee.

  • Note that OracleDatabase folder also have docker files required to build images based on versions 12.2.0.1 and 11.2.0.2 (XE).

Build FMWInfrastructure docker image:

  • Download file fmw_12.2.1.3.0_infrastructure_Disk1_1of1.zip from link and copy into directory OracleFMWInfrastructure/dockerfiles/12.2.1.3.
  • Navigate to the directory OracleFMWInfrastructure/dockerfiles and issue the following command. Option -v indicates the version.

                              sh buildDockerImage.sh -v 12.2.1.3

  • Open OracleFMWInfrastructure/dockerfiles/12.2.1.3/Dockerfile to check the instructions that get executed during the image build. Observe that oracle/serverjre:8 is the base image and this is the exact reason why we built jre image first.
  • Once the build is complete we can see a new image available with tag oracle/fmw-infrastructure:12.2.1.3.

  • Note that OracleFMWInfrastructure folder also have docker files required to build images based on versions 12.2.1.2.

Build SOA Suite docker image:

  • Download files fmw_12.2.1.3.0_soa.jar and fmw_12.2.1.3.0_osb.jar from link and copy into directory OracleSOASuite/dockerfiles/12.2.1.3. Note that these installers are not quick start installers.
  • Navigate to the directory OracleSOASuite/dockerfiles and issue the following command. Option -v indicates the version.

                            sh buildDockerImage.sh -v 12.2.1.3

  • Open OracleSOASuite/dockerfiles/12.2.1.3/Dockerfile to check the instructions that get executed during the image build. Observe that oracle/fmw-infrastructure:12.2.1.3 is the base image and this is the exact reason why we built that image first.
  • Once the build is complete we can see a new image available with tag localhost/oracle/soasuite:12.2.1.3.

  • Note that OracleSOASuite folder also have docker files required to build images based on versions 12.2.1.2.

By creating docker images for DB and SOA Suite, we are done with the installation and yet to configure DB instance, run RCU and configure SOA/OSB domain. Note that the image oracle/fmw-infrastructure has one pre-configured domain named base_domain.

We use docker-compose tool to create containers based on the above images. A sample yaml file docker-compose.yml is located in OracleSOASuite/samples directory.

Prerequisite:

  • Edit ../setenv.sh and set or modify the required env variables and do source ../setenv.sh. At minimum, we need to set DC_ORCL_SYSPWD, DC_ADMIN_PWD and DC_RCU_SCHPWD. Note that i had to set DC_HOSTNAME to ip address like 172.18.0.1 instead of hostname and localhost. Do this as first step before starting up any of the containers below.

Start DB container:

  • The docker-compose.yml file defines a service named soadb that can be used to create DB container. Modify this entry as below:

          soadb:
               image: oracle/database:12.1.0.2-ee
               ports:
                       – “${DC_ORCL_PORT}:1521”
                       – “${DC_ORCL_OEM_PORT}:5500”
               environment:
                      – ORACLE_SID=${DC_ORCL_SID}
                      – ORACLE_PDB=${DC_ORCL_PDB}
                      – ORACLE_PWD=${DC_ORCL_SYSPWD}
               container_name: soadb
               volumes:
                     – ${DC_ORCL_DBDATA}:/opt/oracle/oradata

  • Use command docker-compose up -d soadb to start the db container.

  • When DB container starts for first time, it configures the DB instance, TNS listener and creates some dummy password for SYS user. The logs can be seen using command docker logs -f soadb.

  • Execute docker exec <<container id>> /opt/oracle/setPassword.sh <<pwd>> to reset password for SYS user. Make sure that DB container is running before executing this command. The location of this script file can be derived from the instructions found in OracleDatabase/dockerfiles/12.1.0.2/Dockerfile.ee.
  • After the first time, to restart the container we can use either of the below commands. Make sure to run source ../setenv.sh always before using docker-compose commands.

docker-compose up -d soadb

docker start <<container id>>

  • Connect to db using command sqlplus sys/fusion@//172.18.0.1:1521/soadb as sysdba to make sure that DB is up and running.

  • Command docker stop can be used to stop the container.

Start Admin Server container:

  • docker-compose.yml file has soaas as one of the services which can be used to create the container. Use command docker-compose up -d soaas to start the admin server container.
  • When admin server container starts for first time, it runs RCU to create the required schemas by connecting to db container and also configures a new domain ,. The logs can be seen using command docker logs -f soaas.

  • After the first time, to restart the container we can use either of the below commands. Make sure to run source ../setenv.sh always before using docker-compose commands                 docker-compose up -d soaasdocker start <>
  • Verify you are able to access admin console using http://localhost:7001/console and observe that AdminServer is up and running. The password for admin console will be the value given for DC_ADMIN_PWD in setenv.sh.
  • In data sources, observe that prefix SOA01 is used for SOAINFRA, MDS and others which is the value given for DC_RCU_SOAPFX in setenv.sh.
  • Command docker stop can be used to stop the container.

Start Managed Server container:

Note that i had to use  minimum 6 GB RAM for my ubuntu VM to bring DB, Admin and managed server containers.

  • docker-compose.yml file has soams as one of the services which can be used to create the container. Use command docker-compose up -d soams to start the managed server container.

  • The logs generated in managed server container can be seen using command docker logs -f soams.

  • After the first time, to restart the container we can use either of the below commands. Make sure to run source ../setenv.sh always before using docker-compose commands

docker-compose up -d soams

docker start <<container id>>

  • Access admin console using http://localhost:7001/console and observe that soa_server1 is up and running and also we can see a soa_cluster configured.
  • Command docker stop can be used to stop the container.

Observations:

  • If we want to access the admin console from host OS, we need to configure the port forwarding rules for the VM as shown below.

  • When we are installing DB or SOA Suite in laptop the installation wizard guide us through the steps which makes life easier. But when when we want to use docker files to build images we need to come up with script for the installation and configuration. Typically developer may not have this much acquaintance with these kind of installation scripts and i feel admin help is required. I hope Oracle keep updating the their github repository with newer docker files and scripts whenever a new release is available.
  • I feel debugging containers is difficult and need to look more into this aspect. Initially, when i created VM i used 3 GB RAM  and with this RAM i was able to bring up DB and Admin server container. But when i starting managed server it got stuck and docker logs also did not help me to identify this issue. It was a complete guess by me and increased the RAM to 6 GB which made the things smoother.
  • The docker files uses yum tool which is not available in ubuntu that means, we may need to come up different docker files for different  linux distributions and for Windows OS.
  • The oracle official docker images for Java, DB and FMW Infrastrcture has oraclelinux as the base image. Does that mean oracle does not support in other linux distributions like ubuntu etc. I need to check on this and i welcome readers to let me know if anyone has information on this.

Pages

Enter your email address to subscribe to this blog and receive notifications of new posts by email.

Join 379 other subscribers

Enter your email address to follow this blog and receive notifications of new posts by email.


%d bloggers like this: