In the previous post, We have seen how to use EM Console to create the Job metadata. This did not provide the much information about development and deployment details of ESS application. So in this post, we will use JDeveloper to create ESS Job metadata to call the Service Bus proxy services however the steps remain same for BPEL services too.
Before proceeding with actual creation of job metadata, we will know the terms Hosting and Client Applications.
Hosting Application
ESS Jobs always execute in context of hosting application. When we configure domain for ESS, we get EssNativeHostingApp which is pre-deployed native hosting application that is well suited for custom remote jobs like EJB and web service jobs. However, we can’t execute custom Java jobs.
Client Application
Client applications are typically J2EE application used to submit jobs, query job status and optionally perform updates to ESS metadata. We cannot add ESS job metadata (using MAR archive) directly to the pre-deployed native hosting application and have to deploy through a client application or using metadata API.
More information can be found in ESS documentation here
Creating ESS Application
Select File –> New –> Applications –> Custom Application as shown below.
Enter Application Name.
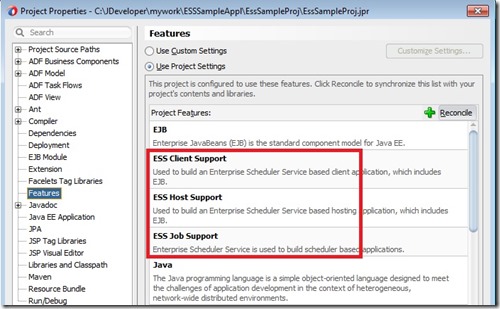
Choose the Project Features as shown below and click Next.
Choose the EJB Version and select Generate ejb-jar.xml as shown below.
Enter a meaningful value for Application Id.
Click Finish and verify that following files got generated in project.
Creating Job Metadata – Job Definition
Create Job Definition following the screenshots below. Select File-> New –> Enterprise Scheduler Metadata –> Job Definition.
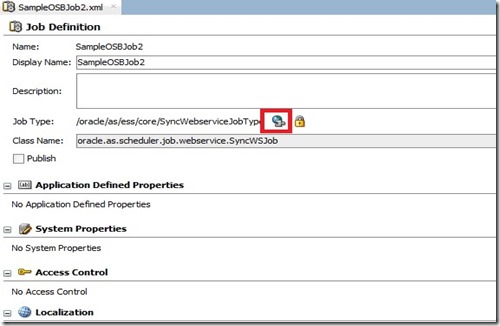
Enter Job name. Since we are going to call a OSB Synchronous service select the corresponding Job type as shown below. Make sure that location includes essmeta directory.
Note that MW_HOME env variable has to be set as shown below to be able to see and select Job Type.
Click Web service icon to select the WSDL.
Select Service Bus as web service type and click search icon.
Enter Service Bus Proxy Service WSDL as shown below and click OK. Make sure that you give the URL of concrete WSDL.
Verify that Service and Port Type are automatically populated. Select the operation and parameterize payload using ESS_REQ as shown below. This context is used to access ESS Parameters defined for Job. Hence we need to create CustomerId parameter. Click OK.
Verify that System Properties are populated as shown below.
Click + in Application Defined Properties section and add CustomerId parameter as shown below and click OK.
Since our job should run in context of the pre-deployed hosting application EssNativeHostingApp, add parameter SYS_effectiveApplciation in System Properties section as shown below.
weblogic-application.xml
Make sure you only have the following library references in this file.
<listener>
<listener-class>oracle.mds.lcm.weblogic.WLLifecycleListener</listener-class>
</listener>
<library-ref>
<library-name>oracle.ess.thin.client</library-name>
</library-ref>
ejb-jar.xml
Add following contents in this file (See the Observations section below).
<enterprise-beans>
<session>
<description>Runtime Session Bean</description>
<ejb-name>RuntimeServiceBean</ejb-name>
<ejb-class>oracle.as.scheduler.ejb.RuntimeServiceBean</ejb-class>
</session>
<session>
<description>Metadata Session Bean</description>
<ejb-name>MetadataServiceBean</ejb-name>
<ejb-class>oracle.as.scheduler.ejb.MetadataServiceBean</ejb-class>
</session>
<session>
<description>Async Request Bean</description>
<ejb-name>AsyncRequestBean</ejb-name>
<ejb-class>oracle.as.scheduler.ejb.AsyncRequestBean</ejb-class>
</session>
</enterprise-beans>
adf-config.xml
If the EAR file generated from this application is to be deployed, certain MDS partition entries must be specified in this file, so add the following contents. The data source referenced here is automatically created when we configure the domain to include ESS. The namespace mentioned over here (highlighted below) should match the package structure we used for creating job definition.
<adf-mds-config xmlns="http://xmlns.oracle.com/adf/mds/config">
<mds-config version="11.1.1.000" xmlns="http://xmlns.oracle.com/mds/config">
<persistence-config>
<metadata-namespaces>
<namespace path="/oracle/apps/ess/custom/osb" metadata-store-usage="ess_custom_metadata"/>
</metadata-namespaces>
<metadata-store-usages>
<metadata-store-usage id="ess_custom_metadata" deploy-target="true" default-cust-store="false">
<metadata-store class-name="oracle.mds.persistence.stores.db.DBMetadataStore">
<property name="jndi-datasource" value="jdbc/mds-ESS_MDS_DS"/>
<property name="repository-name" value="mds-ESS_MDS_DS"/>
<property name="partition-name" value="essUserMetadata"/>
</metadata-store>
</metadata-store-usage>
</metadata-store-usages>
</persistence-config>
</mds-config>
</adf-mds-config>
Deployment
We have to create the following deployment profiles to be able to deploy:
- Project level EJB JAR deployment profile.
- Application level MAR deployment profile.
- Application level EAR deployment profile
EJB JAR Deployment Profile
Use the following screen shots to create project level EJB JAR profile.
MAR Deployment Profile
Use the following screen shots to create application level MAR profile.
EAR Deployment Profile
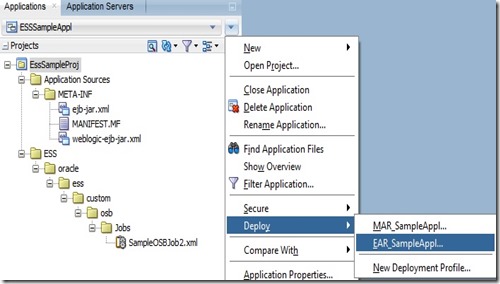
Use the following screen shots to create application level EAR profile.
Deployment
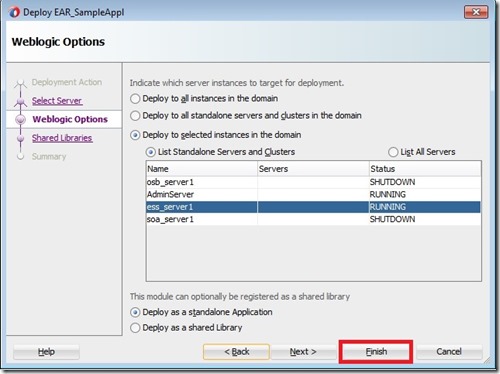
Deploy the EAR file of ESS application as shown in following screenshots.
Here, essUserMetadata is partition used by EssNativeHostingApp. We can observe deployment log as shown below.
Submitting the request
In EM Console, navigate to Scheduling Services –> ESSAPP-> Job Requests –> Submit Job Request. Select application as EssNativeHostingApp and choose the job definition as below and select OK.
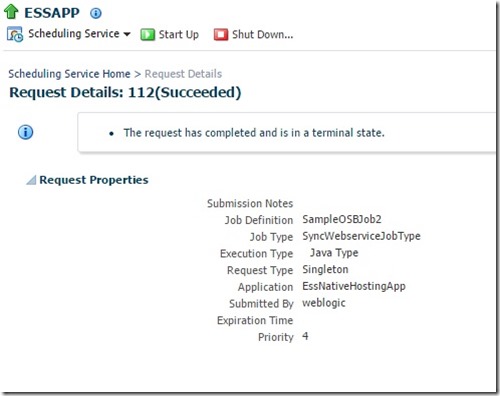
Once the job run is successful, you can see the status as shown below.
The sample application can be downloaded from here.
Observations
- Though we add only ESS Job Support and ESS Client Support features during application creation, we see ESS Host Support as well in Project feature section as shown below.
- Unable to see the Job definitions in ESS while submitting requests, when used package structure (which is effectively a namespace) that does not contain /oracle/apps/ess. Section 1.2.10 of this documentation clearly mentioning that the job definition must be created in the namespace /oracle/apps/ess/custom.
- Unable to refer the WSDL from SOA_MDS or File System in the Web Service chooser during Job definition creation and is resulting into the following error as shown below.
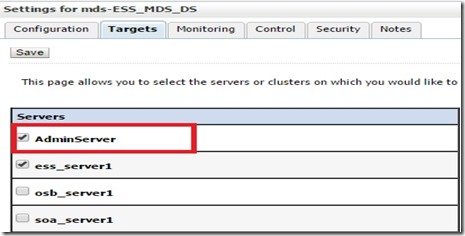
- The data source mds-ESS_MDS_DS is to be targeted to AdminServer as shown below, so that we will be able to select data source during deployment.
- Initially thought, there is no need of ejb-jar.xml in this ESS application as it’s used predominantly to specify Application Name. But was getting following error during deployment when this file is not present in application or the file has empty contents. So at minimum, this file should have the contents as mentioned above.
<May 19, 2015 8:47:48 PM IST> <Error> <Deployer> <BEA-149205> <Failed to initialize the application "Ear_EssSampleAppl" due to error weblogic.management.DeploymentException: Error parsing META-INF/application.xml weblogic.management.DeploymentException: Error parsing META-INF/application.xml











Hi Siva,Thanks for your post. I am trying to create a job definition for a secured https web service but while browsing the WSDL, I keep getting the error as ‘Enter a valid WSDL URL’ .Is it something i am missing while configuring an https service?
Hi Siva,
Thanks for your amazing post, i have this problem in my JDeveloper12c after creating Custom Application and Project, i did exactly as you mentioned, but when i try to create Job Definition, i see Job Type list empty.
I am stuck at screen 9, couldnt proceed further, could you please help me fix the issue. I tried using 12.1.3 and 12.2 versions of Jdeveloper.
Appreciate your help
Did you try reopening the jdev and clear the system folder and see.
Hi, Thanks for posting the steps.Need one help.How do move this jobs from one environment to other.For e.g. In DEV environments we have jdev to deploy the jobs.How do we deploy the jobs if we don’t have connectivity from Jdeveloper ( i mean Production).i would like to know the Test 2 Production strategy for ESS.Thanks in advance.
We have to use MDS import/export with right partition for this purpose.
Hi, I tried this but during the deployment of EAR, as per this blog I should select mds-ESS_MDS_DS metadata. However I only see mds-owsm an mds-soa repositories as options. I am using SOA 12.1.3.Could there be something wrong with my setup?
login to admin console and target ESS data source to admin server and then try to deploy your ess.